What is FreePBX?
A powerful open-source phone platform called FreePBX makes it easier to manage and set up communication solutions. Businesses may build and manage VoIP, PBX, and unified communication systems more easily because to its role as a user-friendly graphical interface for the Asterisk communication framework. With FreePBX, users can easily set up voicemail, build call routing plans, create extensions and manage them, as well as take use of Asterisk’s powerful features. This flexible platform equips businesses to create effective and customised communication systems, whether for small or large corporations, and it also provides affordable answers for contemporary telephone requirements.
top features of FreePBX
1. User-Friendly Web Interface:
FreePBX provides a user-friendly, web-based graphical user interface (GUI) that streamlines telephone system setup and management, which makes it accessible to users with and without technical expertise.
2. Extension Management:
Whether your users are using actual phones or softphones, you can quickly build and setup extensions for them and alter the settings for each extension.
3. Voicemail:
With the sophisticated voicemail system offered by FreePBX, customers may create custom voicemail greetings, retrieve messages from various devices, and get voicemail notifications.
4. Call Routing and Dial Plans:
You have the freedom to create intricate call routing schemes, such as time-based and conditional call routing, to make sure that calls are routed effectively inside your company.
5. SIP Trunking:
SIP trunking is supported by FreePBX, allowing you to connect your PBX to ITSPs and place VoIP calls at reasonable rates.
6. Conferencing:
With the integrated conferencing features of FreePBX, you can create conference rooms for team meetings, webinars, or client consultations.
7. Call Recording:
With choices for on-demand or automated call recording, you may effortlessly record calls for quality assurance, training, or compliance needs.
8. Interactive Voice Response (IVR):
IVR capability in FreePBX enables you to design personalised automated menus to direct callers to the proper departments or extensions.
10. Integration with Third-Party Applications:
To improve productivity and customer relationship management, FreePBX enables connectivity with well-known CRM systems, email platforms, and other third-party apps.
11. Security Features:
With features like firewall integration, fail2ban for intrusion prevention, and encryption for safe communication, FreePBX places a high priority on security.
12. Scalability:
FreePBX is highly scalable, making it suitable for both small businesses and large enterprises, and it can grow with your organization’s needs.
13. Customization with Add-ons and Modules:
With the broad selection of add-ons and modules that FreePBX provides, you may customise your system with extra features and capabilities.
14. Community Support:
There’s a vibrant FreePBX community that provides forums, documentation, and support resources to assist users in troubleshooting and expanding their knowledge.
Are you in need of professional website development services or Asterisk server tech support? Look no further! We invite you to explore our website, www.techfusionnexus.com, where you can discover a world of possibilities for your online presence and telecommunication needs.
This tutorial will demonstrate how to configure ENP in a usual manner while using FreePBX as an IP-PBX. The network diagram is shown in full detail below. Although just one subnet was used in this configuration, the same techniques may be used to set up a PBX in the cloud with many sub-nets. Also take note of the fact that the Vega50 is represented here as two distinct entities, the gateway and the ENP. This is thus because, although using the same hardware as the Vega gateway, the ENP is a “service” that is distinct from it. Also take note that the gateway’s port has been changed to 5062 and the ENP port to 5060.
The Diagram Shows the installation of FreePBX with Enhanced Network Proxy (ENP)

Step 1: Go to “Expert Config->ENP” to begin, where you will see the snapshot below. Put the IP address of FreePBX into the “Realm” column on this page (but leave off the port). Make sure the mode is “forward_to_itsp” so that all communications are forwarded to the ITSP.
After that, enter the username and password for each extension into the “SIP Proxy Auth Users” box, making sure to activate each. When your extensions are registered, you will see them listed in the “SIP Proxy Registered Users” section. In our example, we have IP phones with the numbers 1001 and 1002, and FXS ports with the numbers 0101-0104. In Freepbx, we must use the same username and password You may find instructions for adding these extensions to FreePBX at the bottom of this page.
You may just trust your whole subnet if you don’t want to replicate the accounts and passwords on the Vega. This will instruct the Vega to accept all LAN registrations without asking for a password. Each phone will be asked for a password if the ITSP is operational. A password from the selected LAN won’t be necessary until the ITSP fails. Visit http://wiki.sangoma.com/vega-configuration-enp-trust-lan for information on configuring this.

Step 2: Keep going till you see the following sections, scroll down the page. Although you may use this to whitelist and blacklist particular IPs, you can also leave the filters empty. Now navigate to the SIP ITSP Proxies section and fill in the boxes with the IP address and port of your FreePBX. The test interval as seen below can also be lowered to a lower value of 10ms. If the test interval is lowered, your FreePBX will receive options messages more often, which means that if the FreePBX goes down, ENP will be informed within 10ms. Also check that “options” is selected for proxy test.

Step 3: Navigate to the Trunk Gateways area, where you may enable calls to and from the PSTN. All of the settings are now set to Always, which permits calls in both directions. Next, check to see whether the single trunk gateway is “separate” and “Is PSTN Gateway?” to confirm that the Vega is being used as a trunk. Next, you can allow some numbers, like 911, to be called straight from the trunk gateway (FXO/PRI/BRI) (it is not enabled below). 911 will always utilise the local POTS line rather than SIP, which is advantageous. The last part should be left as-is; the value “all” in the first column indicates that all trunks will be used in failover.

Step 4: Click “modify” on the first profile under “Expert Config -> SIP -> SIP Profiles” and the information below will appear. Leave all other settings at their defaults and type the IP address of the FreePBX in the local domain box.

Step 5: Next, scroll down to the section titled “SIP Profile 1 Proxy Parameters” and click the first SIP proxy to alter it.

Step 6: Lastly, insert the Vega’s IP (which is also ENP’s IP) into the box. Keep the port at 5060 (the ENP port), please.

Step 7: Locate the section Sip profile 1 registration parameters 1 by scrolling down the SIP profile 1 page and clicking “modify” next to the first register.

Step 8: Now enter the Vega’s IP (which is also ENP’s IP) into the box. Keep the port at 5060 (the ENP port), please.

Step 9: Click “Expert Config -> SIP” and General will be at the top of the page. Change the port to “5062” (a gateway port), as indicated below.

Step 10: Next, enable registration in “Expert Config -> SIP” by ticking the box next to Registration.

Step 11: On the IP phone, configure the vega gateway as the outbound proxy and the FreePBX IP address as the sip server.

Step 12: We need to add the same extensions in FreePBX. We will demonstrate how to add one extension, and you may report the others as needed.

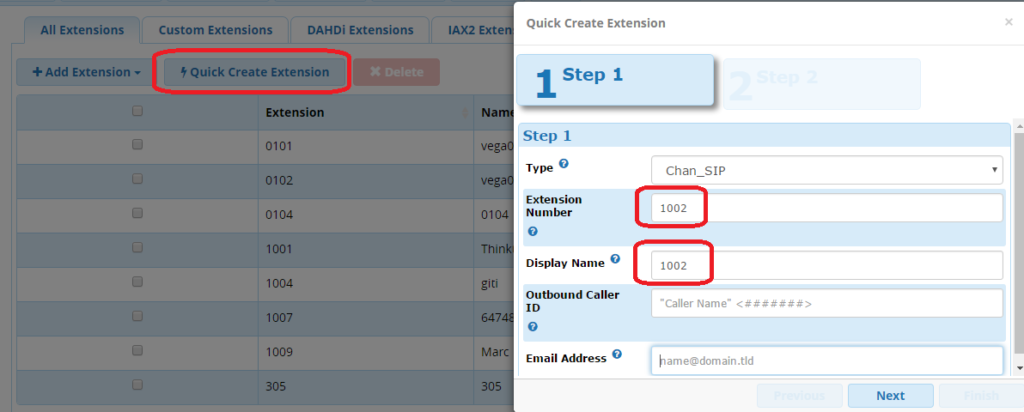
Step 13: Select Quick Create Extensions, enter the extension 1002 there, and then click Next to create your extension. The final step is to apply config to make the modifications.
Step 14: Check the status in Vega and FreePBX in.
Once everything is configured and phones are added to the FreePBX via vega, go to FreePBX and select Reports > Asterisk Info > Peers.

Eventually this screen will appear, indicating that the FreePBX has registered the extensions 1001 and 1002 with the host being the Vega IP address.

When FreePBX is accessible, the ITSP status and extents are indicated under SIP Proxy Registered Users in the Vega’s Expert Configuration -> ENP. If the connection between Vega and FreePBX is lost, the ITSP status will also be lost.
